
As a crafter and member of the Glue Dots® Adhesives Design Team I'm constantly looking for new ways to challenge my Glue Dots® Adhesives. Since I'm in love with all things "grungy" I thought I create some gifts for a few friends at Christmas with Grungepaper and Glue Dots® Adhesives.
I had total fun playing with Idea-ology's Grungepaper, inks, stamps, paints, lace, trinkets, AND Glue Dots® Adhesives. I was up to my elbows in colors. And Jim took me out to dinner looking that way! LOL He's use to it.
Here are a few of my Gungepaper Potpourri Cones.


Ingredients
Glue Dots® Adhesives
Pop Up
Craft
Continuous Line
Grungepaper by Idea-ology
Tim Holtz Distress Inks: Peeled Paint, Fire Brick, Tea Dye and Victorian Velvet
Ranger Archival Ink; Paint Dabber: Snow Cap
Tattered Angels Glimmer Mist Scarlet; Glimmer Screen: Winter Crystals
Studio 490 Stamps: Ticket to Art, Art of Making It Merry, Flower Art
Santa Stamp by Rubber Stampde
Idea-ology Trinkets
Crochet Lace
Sakura Black Glaze Pen
Potpourri
Fiskars Circle Cutter, Tim Holtz Tonic Scissors
Instructions
1. Cut an 8-inch circle from the Grungepaper.
2. Cut the circle in half. You have the foundation for two cones.
3. Ink or spray a foundation color to both the front and back of the Grungepaper.
4. Once it’s dry, add a background stamp. On one cone use Studio 490’s background stamp from Art of Making It Merry Collection. To the other cone add another layer of color using the Glimmer Screens (snow flake) to create a light background pattern.
5. Dab Snow Cap paint to Studio 490’s background stamp (pitted) from the Ticket to Art Collection. Add it to the cone that has the black background stamp.
6. To create the cone add Glue Dots® Adhesives Continuous Line on the front edge of one side and back edge of the other side of the half circle. Bring the edges together, overlapping to form a cone. Press your adhesive and Grungepaper together! No drying time and works wonderfully!
7. Place Glue Dots® Adhesives Continuous Line around the top of the cone. Attach the crochet ribbon by starting where the cone comes together and adhere around the top of the cone.
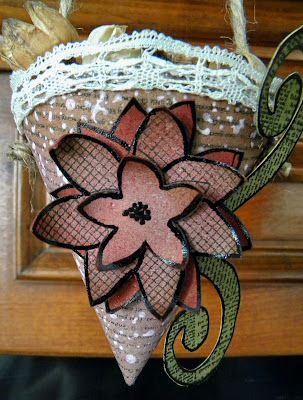
8. To one cone add a poinsettia from Studio 490 Art of Making It Merry Collection. Stamp the image three times, ink with Fire Brick Distress Ink, and cut out three different layers. Suggestion: use a variety of background stamps to make each layer different. Go back over the stamped image with the back glaze pen. Put the poinsettia together using Glue Dots® Adhesives Pop Ups. Add another element from the stamped image Studio 490’s Flower Art (the swirls) inked with Peeled Paint Distress Ink, cut out. Put the poinsettia and swirls together on the cone with Glue Dots® Adhesives Craft Dots.
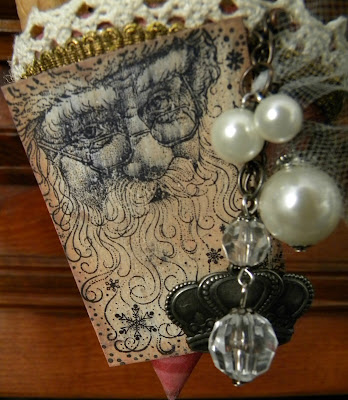
9. To the other cone add elements from Stampde Santa Stamp. Cut the Grungepaper the size of the stamp, dab with Paint Dabber Snow Cap and let dry. Stamp on image and distress the edges with Tea Dye Distress Ink. Adhere to the cone with Glue Dots® Adhesives Craft Dots.
10. Using several different trinkets from the Idea-ology line create a cascade of jewels, peals, pieces of tulle, what ever you have around the house. I put mine together with Tim Holtz Swivel Clasp. Attached to the cone with a brad.
11. Fill with your favorite potpourri!
This makes a wonderful gift for office friends, teachers, and family. Grungepaper will out last ordinary paper and makes a gift they can use year after year. Glue Dots® Adhesives works amazingly strong on Grungepaper, does not dry out while placing everything together, and holds very well. I’m loving my new combo of Grungepaper and Glue Dots® Adhesives.
I wrote this blog post while participating on the Glue Dots® Adhesives design team.
2. a dinner with Jim
3. understanding
4. timeless advice from my Grandmother
5. God, who not only teaches me from my mistakes, but from my victories as well.
I had total fun playing with Idea-ology's Grungepaper, inks, stamps, paints, lace, trinkets, AND Glue Dots® Adhesives. I was up to my elbows in colors. And Jim took me out to dinner looking that way! LOL He's use to it.
Here are a few of my Gungepaper Potpourri Cones.


Ingredients
Glue Dots® Adhesives
Pop Up
Craft
Continuous Line
Grungepaper by Idea-ology
Tim Holtz Distress Inks: Peeled Paint, Fire Brick, Tea Dye and Victorian Velvet
Ranger Archival Ink; Paint Dabber: Snow Cap
Tattered Angels Glimmer Mist Scarlet; Glimmer Screen: Winter Crystals
Studio 490 Stamps: Ticket to Art, Art of Making It Merry, Flower Art
Santa Stamp by Rubber Stampde
Idea-ology Trinkets
Crochet Lace
Sakura Black Glaze Pen
Potpourri
Fiskars Circle Cutter, Tim Holtz Tonic Scissors
Instructions
1. Cut an 8-inch circle from the Grungepaper.
2. Cut the circle in half. You have the foundation for two cones.
3. Ink or spray a foundation color to both the front and back of the Grungepaper.
4. Once it’s dry, add a background stamp. On one cone use Studio 490’s background stamp from Art of Making It Merry Collection. To the other cone add another layer of color using the Glimmer Screens (snow flake) to create a light background pattern.
5. Dab Snow Cap paint to Studio 490’s background stamp (pitted) from the Ticket to Art Collection. Add it to the cone that has the black background stamp.
6. To create the cone add Glue Dots® Adhesives Continuous Line on the front edge of one side and back edge of the other side of the half circle. Bring the edges together, overlapping to form a cone. Press your adhesive and Grungepaper together! No drying time and works wonderfully!
7. Place Glue Dots® Adhesives Continuous Line around the top of the cone. Attach the crochet ribbon by starting where the cone comes together and adhere around the top of the cone.
8. To one cone add a poinsettia from Studio 490 Art of Making It Merry Collection. Stamp the image three times, ink with Fire Brick Distress Ink, and cut out three different layers. Suggestion: use a variety of background stamps to make each layer different. Go back over the stamped image with the back glaze pen. Put the poinsettia together using Glue Dots® Adhesives Pop Ups. Add another element from the stamped image Studio 490’s Flower Art (the swirls) inked with Peeled Paint Distress Ink, cut out. Put the poinsettia and swirls together on the cone with Glue Dots® Adhesives Craft Dots.
9. To the other cone add elements from Stampde Santa Stamp. Cut the Grungepaper the size of the stamp, dab with Paint Dabber Snow Cap and let dry. Stamp on image and distress the edges with Tea Dye Distress Ink. Adhere to the cone with Glue Dots® Adhesives Craft Dots.
10. Using several different trinkets from the Idea-ology line create a cascade of jewels, peals, pieces of tulle, what ever you have around the house. I put mine together with Tim Holtz Swivel Clasp. Attached to the cone with a brad.
11. Fill with your favorite potpourri!
This makes a wonderful gift for office friends, teachers, and family. Grungepaper will out last ordinary paper and makes a gift they can use year after year. Glue Dots® Adhesives works amazingly strong on Grungepaper, does not dry out while placing everything together, and holds very well. I’m loving my new combo of Grungepaper and Glue Dots® Adhesives.
I wrote this blog post while participating on the Glue Dots® Adhesives design team.
Gratitude List
1. time with my children2. a dinner with Jim
3. understanding
4. timeless advice from my Grandmother
5. God, who not only teaches me from my mistakes, but from my victories as well.
These are amazing!
ReplyDeleteYour cones are gorgeous Debby! They would make wonderful gifts filled with treats too! Thanks so much!...Nancy :o)
ReplyDeleteoooooo love the projects. sooo victorian. yum!
ReplyDeletethese are sp pretty, Debby!!! just lovely!!!
ReplyDeleteWow Debby, those are just gorgeous!!
ReplyDeleteStunning! I love them!
ReplyDeleteWonderful idea that you came up with! They are both great, but I really like the poinsettia. You did a good job of sharing your directions, thank you for taking the time to do so.
ReplyDeleteThese are fantastic Debby, I can't wait to try them. Thanks for sharing!
ReplyDeletevery pretty! Those would be fun filled with Christmas goodies too...could reuse them as ornaments on your tree.
ReplyDeleteDebbie- What a FUN Christmas Project! :) Might have to steal it! ;)
ReplyDeleteThose are so pretty! I love the one with the flower. Awesome job.
ReplyDeleteVery pretty Debby!
ReplyDeleteGreat projects- thanks for including the instructions!
ReplyDelete