
UPDATE: How Cool Is This? Ranger's Blog
I love to read Ranger's blog. They have tutorials, tips, and techniques. The projects by their designers are incredible. (I love their products!) Early this month Ranger had a blog post entitled Distress Ink Artsy Tag.
Okay, here comes a bit of the story. I have made Tim Holtz's Christmas Tags every year since he started. I have them hung on my "coat rack" turned organizer. They are my teaching/learning tool when I want to do something new. I love the way this Distress Ink Artsy Tag looked, so I Dared myself: could I do this on a layout?
The Story
I have tons of photos of my family growing up and even of my dad and mom's family while they were growing up. Jim's family has given me many photos of this part of my family. These are wonderful pictures of Judy, Jim's sister, growing up. Don't you love the rocking horse, the teddy bear, and Christmas tree? The flowers are the perfect background as well.
The Layout

 What I Learned
Congratulations to Connie Mercer!
Those of you who may not know I have several lines of unfinished vintage tags. I'm slowly working on a new line called "Generations." Connie does a marvelous job designing and creating pieces of art with Debby's Design Tags. Connie was published in Scrap Street this month using one of Debby's Design Tags. Yeah!
Photos of all the sets will be going up on my blog under a new tab soon.
Have a Crafty Day!
Gratitude List
1. Jim and Judy
2. Raelyn hugs
3. Hannah's beautiful spirit
4. the joy of creating
5. God's gift to me in my daughter
I love to read Ranger's blog. They have tutorials, tips, and techniques. The projects by their designers are incredible. (I love their products!) Early this month Ranger had a blog post entitled Distress Ink Artsy Tag.
Okay, here comes a bit of the story. I have made Tim Holtz's Christmas Tags every year since he started. I have them hung on my "coat rack" turned organizer. They are my teaching/learning tool when I want to do something new. I love the way this Distress Ink Artsy Tag looked, so I Dared myself: could I do this on a layout?
The Story
I have tons of photos of my family growing up and even of my dad and mom's family while they were growing up. Jim's family has given me many photos of this part of my family. These are wonderful pictures of Judy, Jim's sister, growing up. Don't you love the rocking horse, the teddy bear, and Christmas tree? The flowers are the perfect background as well.
The Layout
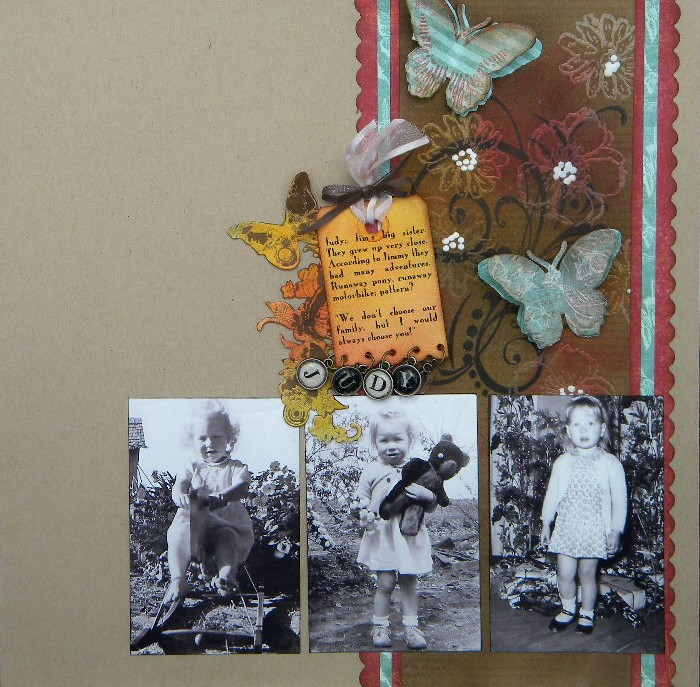

- Make the tag ahead of time so you can have an understanding of the techniques.
- Don't make your background too dark. I should had stopped a few layers earlier.
- Use stamps that would be better for showing off your foundation colors. I wanted a more sophisticate flower but this is what I had. It was only an outline and did not show off the technique as well.
- You can make your foreground become background. After I finished embossing the flowers and inking the paper I stamped the flourish. I didn't like the way it stamped on my flowers. I took a paper towel and wiped it off the embossing. Now it looks like a background stamp.
- I love how white can pop a page. The white centers of the flowers are Ranger's Enamel Accents.
- You can pop your butterflies. Yes, I'm still on the butterfly kick. I cut these from Graphic 45's Once Upon a Springtime. I ran the die through my Cuttlebug then placed the cut image onto inked embossing folders. I de-embossed. The ink "engraved" itself on the image. I went back and "painted" Perfect Pearls Gold into the de-embossed spots. It was too cool and made the whole butterfly shine.
- Don't waste the practice tag. I cut mine out and added it as a background to my journaling tag.
- Pumice Stone Distress Ink is incredible. I used Pumice Stone to stamp words to the background of the flowers. Even after I took it a bit too dark I can still see the writing. Awesome!
- You can ink your tag (here the journaling tag), let it thoroughly dry. Type and print your journaling on computer paper. Tape your inked tag face up, centering your journaling on the tag, and print! Works great.
- On an earlier tag I used a wet wipe to wipe off the ink from the embossed area. It didn't work as well for me because it took off some of the surrounding ink. I just wasn't detailed enough. I did use a paper towel and it worked great.
Congratulations to Connie Mercer!
Those of you who may not know I have several lines of unfinished vintage tags. I'm slowly working on a new line called "Generations." Connie does a marvelous job designing and creating pieces of art with Debby's Design Tags. Connie was published in Scrap Street this month using one of Debby's Design Tags. Yeah!
Photos of all the sets will be going up on my blog under a new tab soon.
Have a Crafty Day!
Gratitude List
1. Jim and Judy
2. Raelyn hugs
3. Hannah's beautiful spirit
4. the joy of creating
5. God's gift to me in my daughter
I love it! You did a great Job. :-) I'm going to check out the pumice stone ink. I've never tried that. TFS!
ReplyDeleteA fabulous technique-laden layout. So refreshing! Thanks for sharing today :)
ReplyDeleteGREAT page, Debby! LOVE your list of "learns."
ReplyDeleteCongrats to Connie for her pub!
oh gosh! that embossing resist is amazing!!! gorgeous
ReplyDeleteLove the LO Debby~lovely effect using the inks!!!
ReplyDeletebeautiful layout as ever debby!
ReplyDeleteYour layout looks great.
ReplyDeleteHi, I just recently moved to Cayce and Im looking for new friends and a new church, maybe we can chat sometimes! I love to do crafts, check out my page Allison Wonder Land
ReplyDeletewow, great page, I found you over at the Ranger Blog. Way to go!
ReplyDeleteSo Sweet Debby! Great write up on Ranger Inks Blog too! You go girl!
ReplyDeleteWhat a gorgeous layout!
ReplyDeletewow! I love your layout! thank you so much for all the techniques!! I can't wait to try them out!
ReplyDeletegreat page-i too love pumice stone--such a great color
ReplyDeleteWhat a gorgeous page!! Congrats on the Ranger blog... well-deserved!
ReplyDeleteOne word-GORGEOUS!! It looks like a lot of fun, and those techniques would definitely push my skills and knowledge, I'll have to check out the Ranger blog and start playing..thanks for sharing!
ReplyDeleteDebby... that's so cool! And it's beautiful too. Lovely job. And congrats for the recognition. It's well deserved.
ReplyDelete