
Roni Johnson is my guest today for the 12 Days of Home for the Holidays. I met Roni at the Craft and
Hobby Association Trade Show. She gave me her card and I've been a Roni fan ever since. Her business cards are handcrafted and incredible.
Roni is an Author, Designer, and Instructor. Roni is a premier rubber stamper, collage, and altered artist. Check out Roni's book: "Teach Yourself Visually - Collage & Altered Arts." You can find Roni's stamps on Queen Kat's Stamps... Roni also serves on the Stampers Best , Third Coast Rubber Stamps, and Just for Fun design teams.
Welcome Roni!
Roni Johnson


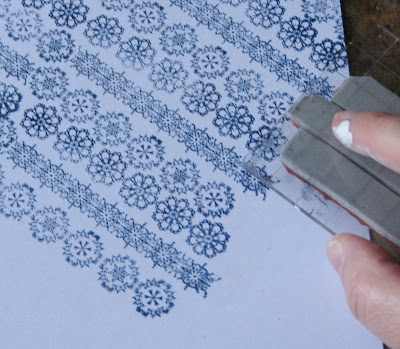
A. Align the three snowflake border stamps (from the Christmas Holly Borders set) on a single acrylic stamping block. Use blue Archival Ink and begin stamping the snowflakes in any desired pattern on a 5.5x8.5” sheet of white cardstock. Continue stamping until the entire sheet has been covered with snowflakes.


Hobby Association Trade Show. She gave me her card and I've been a Roni fan ever since. Her business cards are handcrafted and incredible.
Roni is an Author, Designer, and Instructor. Roni is a premier rubber stamper, collage, and altered artist. Check out Roni's book: "Teach Yourself Visually - Collage & Altered Arts." You can find Roni's stamps on Queen Kat's Stamps... Roni also serves on the Stampers Best , Third Coast Rubber Stamps, and Just for Fun design teams.
Welcome Roni!
Roni Johnson

Christmas has always been a big deal in my family. My mom would always spend the day after Thanksgiving decorating the entire house, transforming it into a real Christmas wonderland. That love of decorating for the holidays is in my blood. While I do put out a few store-bought decorations I love making my own even more!
Today I thought I’d share a fun project that is not only quick and easy but it also incorporates another love I have…rescued (recycled) goodies that might otherwise end up in the trash bin.
Enjoy ~
Altered Clock Snowmen Trio
Altered Clock Snowmen Trio
By: Roni Johnson

Finished Size: Varies

Supplies:
Stampers Best Stamps: Snowman Hugs SSJ125; Snowman Caroling SSJ127; Snowman & Birdies SSJ128; Christmas Holly Borders SC02003
Stampers Best Cling Cushion Scraps
Old/Junk Travel or Alarm Clock
Archival Ink (Blue & Black) – Ranger Industries
Distress Ink – Ranger Industries
Distress Stain or Glimmer Mist Dye Inks
Bic Markers
White Acrylic Paint
Glass Glitter – Meyers Imports
Mica Snowflakes – German Corner Store
Liquid Glue
Super Glue
Cardstock – Georgia Pacific
Tissue Paper
Instructions:
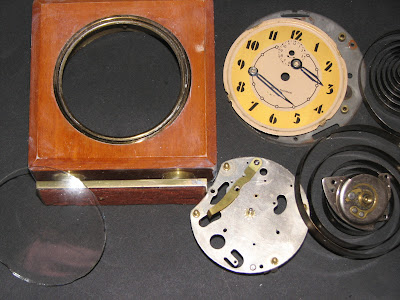
1. Carefully disassemble your clock. You will most likely need a tiny screw driver and a pair of needle nose pliers. You will need to determine which parts you will need to build your shadow box and how you will reassemble it. Most of the time you will have a metal housing from the back of the clock movements for the shadow box and can be super glued back in place if it can’t be reassembled with the existing hardware.

2. Stamp each snowman on white cardstock using Archival Ink. Color as desired, trim and set aside for later use.
3. Prepare each clock by painting it with white acrylic paint. Let it (them) dry completely.


4. The outside of each clock was decorated using a different technique. Your clocks may or may not be similar to the clocks used for this example, these general directions will give you a general idea on how to go about decorating your clock. Each technique is described below…
Snowman Hug –


B. Color this sheet of paper with liquid dye inks (Distress Stain; Glimmer Mist, etc.) as desired. Let it dry completely.
C. Trim the paper into strips and glue each strip to the clock covering the sides and back of the clock.

D. Stamp the face plate in a similar fashion as you did the paper trim.

E. Glue glass glitter and mica snowflakes to the edge of the face plate.

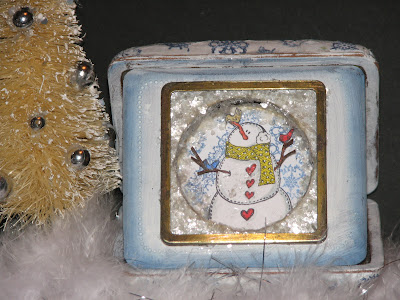
F. This clock has a cavity that I created the shadow box in. The inside of the clock was painted, a scrap of cardstock was inserted to cover the holes in the back of the clock and I covered the seams around the paper with mica snowflakes.
G. It’s time to insert the snowman into the shadow box. To lift the snowman off of the background so it looks like it’s free standing I stick 3-4 pieces of scrap cling cushion together and glue the snowman to this stack of cushion. I then glue the snowman in the shadow box.

H. Replace the face plate and glue it into place.

I. If there is a space between the Snowman image and the bottom of your clock add a bit of glue in the space and sprinkle on an additional layer of mica snowflakes.

Fa la la la la Snowman

a. After this clock was painted with acrylic paint I simply sanded the edges to distress and reveal the wood.
b. I used the metal housing from the back of the clock movement to build the shadow box. I covered the bottom of the metal housing with a combination of blue glass glitter and mica snowflakes. I used the same method of lifting and attaching this snowman as I did in step “G” from the Snow Hug Clock.

c. Insert and glue the metal housing which contains the snow scene back in the clock.
Birds of a Feather Snowman

aa. Cut one snowflake from each of the snowflake borders. You will use these individual snowflakes to create the tissue paper used to cover the final clock.

bb. Cut a sheet of tissue paper large enough to cover your clock.
cc. Position all three snowflakes on a single acrylic block and use blue Archival Ink to stamp these snowflakes on a sheet of white (or colored) tissue paper.

dd. Once the entire sheet of tissue paper has been stamped let it dry completely. After the tissue paper is dry, gently crumble then open it back up.
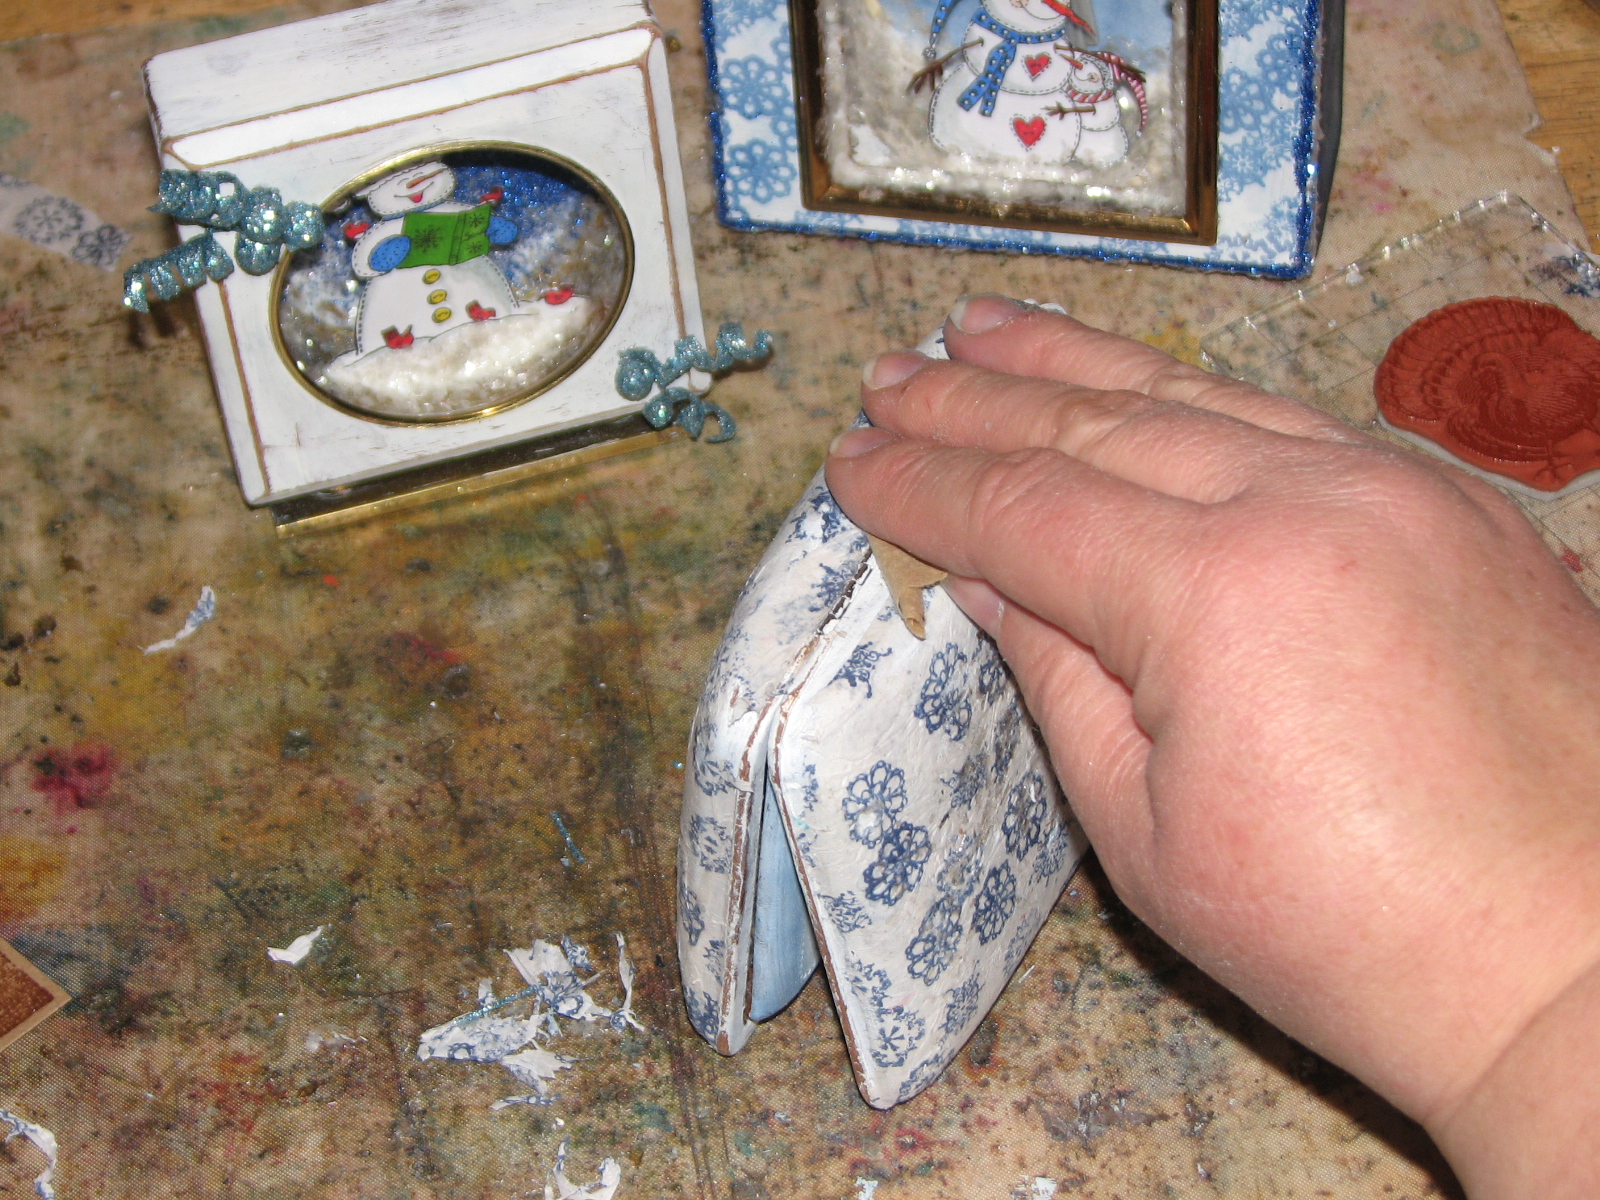
ee. Apply a thin layer of liquid glue to the outside of the clock.

ff. Carefully position the tissue paper in the wet glue. Avoid pushing and pulling the tissue paper very much as it will be very fragile. Simply press it directly into the glue. Don’t worry about wrinkles here or there, it only adds character.
gg. After you have completely covered your clock with the stamped tissue paper set it aside to dry completely.

hh. When the paper has dried, tear away the larger pieces of excess tissue paper. Use sand paper to remove any smaller bits.
ii. The shadow box for this clock was created using the metal housing as was used in “Fa La La La La” clock.
Roni Johnson
Make sure to leave a comment or question for Roni.
Creative altered art! Thanks Roni for the tutorial, clear instructions, and the photos. Tomorrow's guest is Katrina Kennedy.
PS For those who could not open the .pdf file for Aly's mug pocket card, I've reposted it in .jpeg format. Aly's Template.
PS For those who could not open the .pdf file for Aly's mug pocket card, I've reposted it in .jpeg format. Aly's Template.

Very cute!
ReplyDeletelove the way your mind works~amazing projects!!!Beautiful!!!!
ReplyDeleteSo super cute! Love the trio! Great job! Thanks for sharing & being a guest blogger! -Amanda
ReplyDeleteRoni's work is amazing. She is so talented and such a generous person. She is always willing to answer questions or demonstrate techniques for us. This trio is just a small sample of her work.
ReplyDeleteElaine Allen
Love those clocks!!! Gorgeous! Roni always has amazing stuff!
ReplyDeleteSuper idea Roni!
ReplyDeleteYeah for Roni!
ReplyDeleteWhat an amazing project!
ReplyDeleteLoving this repurposing. Roni has done it again as usual. Great tut.
ReplyDeleteLesley
always luv your creations Ronit..always! xo
ReplyDeleteDarling "timeless" Xmas decor!
ReplyDeleteThat is one awesome project. I love how you have reused an old item and turned it into a beautiful keepsake.
ReplyDeleteIt takes a special eye to see the beauty that can be in something old or unattractive and turn it into beauty! You certainly are that special person.
ReplyDelete