
I've seen these pretty ticket style photos around. Sort of a photo booth style photo series. They were professionally created. I was determined to create my own ticket photo strip and make it vintage style. So here we go.
This is my granddaughter little Ali that was born in August. This was her first professional photo shoot.


Don't forget to mark your calendars for the 12 Days of Home for the Holidays. Our sponsors are listed on the right side of the blog. There will be 12 wonderful crafters from our vast crafting community and a large giveaway. Do you know Thanksgiving is next week? Goodness how time flies!
Have a Crafty Day!

Gratitude List
1. safety for my family
2. spending time with my daughter's family
3. my comforting, loving husband
4. cooler weather
5. God's grace each and every moment I take a breath
This is my granddaughter little Ali that was born in August. This was her first professional photo shoot.

Click on any photo to enlarge and see details
Ingredients: Graphic 45’s Little Darling paper collection; embossing: Sizzix/Basic Grey Peppermint Twists &
Scallops; die cut: Sizzix/ Tim Holtz Alterations Ticket Strip; banner: Prima/Donna
Downy banner; Tim Holtz Distress Ink Vintage Photo, Walnut
Stain, and Alpha Parts Newsprint;
We R Memory Keepers Twine; title: Ali Edwards’
rub on; other elements: Queen
and Co pearls; Graphic 45 Little Darlings chipboard button; Wilton Doilies; Ranger Archival Ink Coffee; stamps: Fiskars; tools: Cuttlebug die cut
machine; Fiskars micro-tip scissors; Fiskars Round ‘n Round Squeeze Punch; 1934
Royal KHM typewriter
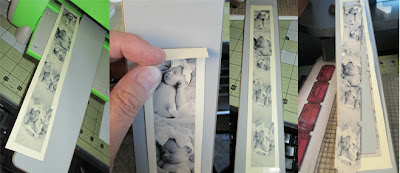
How to Create the Ticket Photo Element
I used Photoshop Elements to resize and line up my photos. You can also tape original photos to a piece of paper and scan them then resize the strip. Make sure your photos are the same length, but a bit wider as the ticket die cut.

- Choose five photos, crop each one 2 x 1.25, make black and white with the infrared setting
- Open a new document, 4 x 10; transparent background; turn on grid
- Add each photo end to end with some of the photo bleeding beyond the 1” grid mark
- Crop the entire photo strip down to just the photos once all five photos are added
- Print photo on Presentation setting onto a light weight manila paper (Hobby Lobby)

- Trim some of the excess paper away from the photo strip
- Tape each end of the photo strip to the Tim Holtz Alteration Ticket Strip, make sure to pull taut then tape
- Cut

- Ink edges with Tim Holtz Distress Ink Vintage Photo
- Create a rounded edge, rectangle template to fit inside each ticket
- Trace the rectangle onto each ticket photo using Tim Holtz Distress Markers, Vintage Photo
- Cut several tiny words from a stamp of a quote, title, etc.
- Stamp a different word to each ticket using Ranger’s Archival Ink Coffee

- Distress the edges
- Light ink the edges again with Tim Holtz Distress Ink, Walnut Stain
Don't forget to mark your calendars for the 12 Days of Home for the Holidays. Our sponsors are listed on the right side of the blog. There will be 12 wonderful crafters from our vast crafting community and a large giveaway. Do you know Thanksgiving is next week? Goodness how time flies!
Have a Crafty Day!

Gratitude List
1. safety for my family
2. spending time with my daughter's family
3. my comforting, loving husband
4. cooler weather
5. God's grace each and every moment I take a breath
Awwww, such an adorable page and super cute baby! :)
ReplyDeleteawesome~no photo shop here!!! Looks gorgeous girl!!!!
ReplyDeleteAbsolutely adorable! And that ticket strip is a wonderful way to add more photos to the layout.
ReplyDeleteGorgeous page...love your photo ticket strip!
ReplyDeleteLove your photo ticket strip. thanks for the tutorial.
ReplyDeleteWow, love the ticket strip, it turned out beautiful
ReplyDeleteamazing thanks for sharing!
ReplyDeleteWow, that is an awesome layout and idea. Thanks for sharing.
ReplyDeleteWow - i have never seen those before. Just gorgeous!
ReplyDeleteThis is stunning! And that strip is the icing on the cake.
ReplyDeleteAWESOME projects and tutorial. Definitly going to do this.
ReplyDeleteThanks for sharing this! I will be using this in the future, if I don't lose it! Fabulous job!
ReplyDeleteOh and that baby, GORGEOUS!
Debbie, what a special layout for a special little girl! I stopped by specifically to check out your film strip tute/info (you got a shout out from a Y! group) but am blown away by everything in your layout. I find myself finding new details. Now I must go look again--simply wonderful!
ReplyDeleteSweet layout and wonderful job on the tickets. So vintage and adorable!! TFS
ReplyDeleteBeautiful baby and awesome art and tutorial.Thanks for sharing.
ReplyDeletesusan s.